Lath and Plaster Repair
We do not work in the City of Buffalo
Lath (Pre 1950)
Rocklath (1950-1970)
Plaster Cracks?
Plaster Ceiling Repair
Water Damage?
Skim Coating & Level 5 Finishing
Using Mesh tape for crack repair
The two of the most common building materials used for interior wall and ceiling construction in history is plaster and drywall (also known as gypsum board or sheetrock). They have very distinct characteristics and applications, and depending on the age of your home, will largely dictate which materials are used in your home. In WNY, if your house was built in the 1940's (and earlier) its most likely horse hair plaster over wood lath. In the 1950's rocklath was invented (predecessor to drywall) which replaced wood lath.
Plaster is traditionally made from a mixture of gypsum, lime, sand, plaster of paris and water. It is applied in layers and sets to form a hard, durable surface. (Which is usually impervious to children) Plaster is applied by hand, and troweled onto the surface. Where as drywall is faster and simpler. It involves attaching sheets of drywall to the framing, taping the joints, and applying joint compound, also referred to as 'mud'. Three coats of joint compound is the industry standard for finished drywall for painting. The process is quicker than plastering, and cheaper.
Wood lath, often referred to simply as "lath," is a building material historically used as a base for plaster in walls and ceilings. Lath consists of thin, narrow strips of wood that are about 1 inch wide and 4 to 8 feet long. These strips are installed horizontally, with small gaps (about 1/4") between them, to create a framework or lattice on which plaster was applied. The primary purpose of lath is to support the plaster. Plaster has a mechanical bond with lath via 'keys'. When applying plaster to lath, the plaster is pushed into the gaps, forming a mechanical bond that helps hold the plaster in place as it hardens and dries.
Rocklath replaced woodlath and is the precursor to drywall/sheetrock. A plasterer would apply plaster basecoat to rocklath, and then plaster finish is applied to the basecoat to form the walls and ceilings. In the 1960's and beyond, drywall became the preferred method for wall and ceiling finishing in the United States due to its numerous advantages over traditional plaster systems. Mainly in the cost of construction, speed, and skills required to properly finish drywall. It takes much more skill, and labor to finish a plaster house, than it does to finish a drywall house.
Plaster is almost Child Proof
Plaster Ceiling Repairs
Damaged plaster ceilings can be very intimidating for homeowners and contractors alike. Whether its cracks, bulges, or water damage. Most painting contractors do not like to repair plaster and would prefer to avoid it. Its very easy to under-estimate the size of the repair when it comes to plaster repair work. Every plaster patch has a distinctive challenge with its own set of complexities not found in any other building trade.
The biggest mistake most people make when repairing plaster ceiling damage is not using the proper technique or materials, often resulting in less than ideal results. This becomes most evident when someone repairs a hole in a plaster ceiling or wall, and they stick a piece of drywall in the hole and finishes it like a drywall patch.
Painters often mistakenly treat a plaster repair, like a drywall repair. The problem with this, is that plaster ceilings and walls are finished by hand, and are inherantly not flat. Where as drywall, is dead flat as it was made in a factory. The drywall patch in a plaster ceiling stands out like a sore thumb.
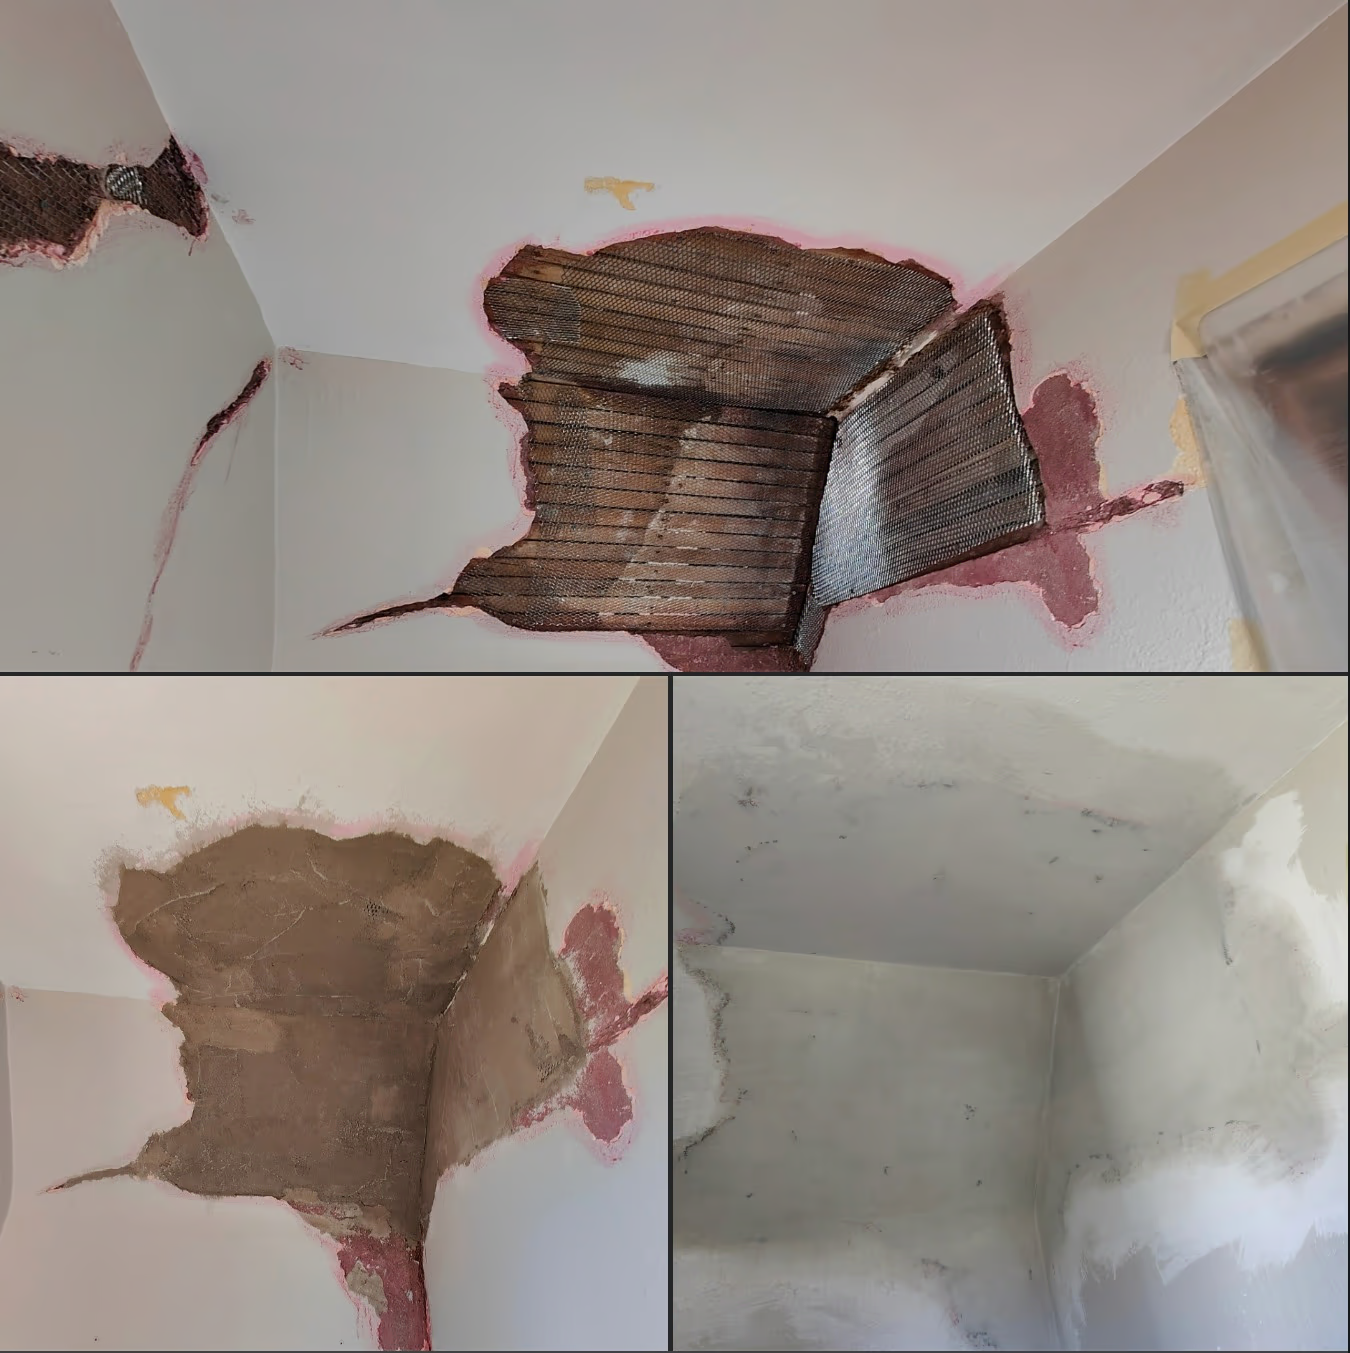
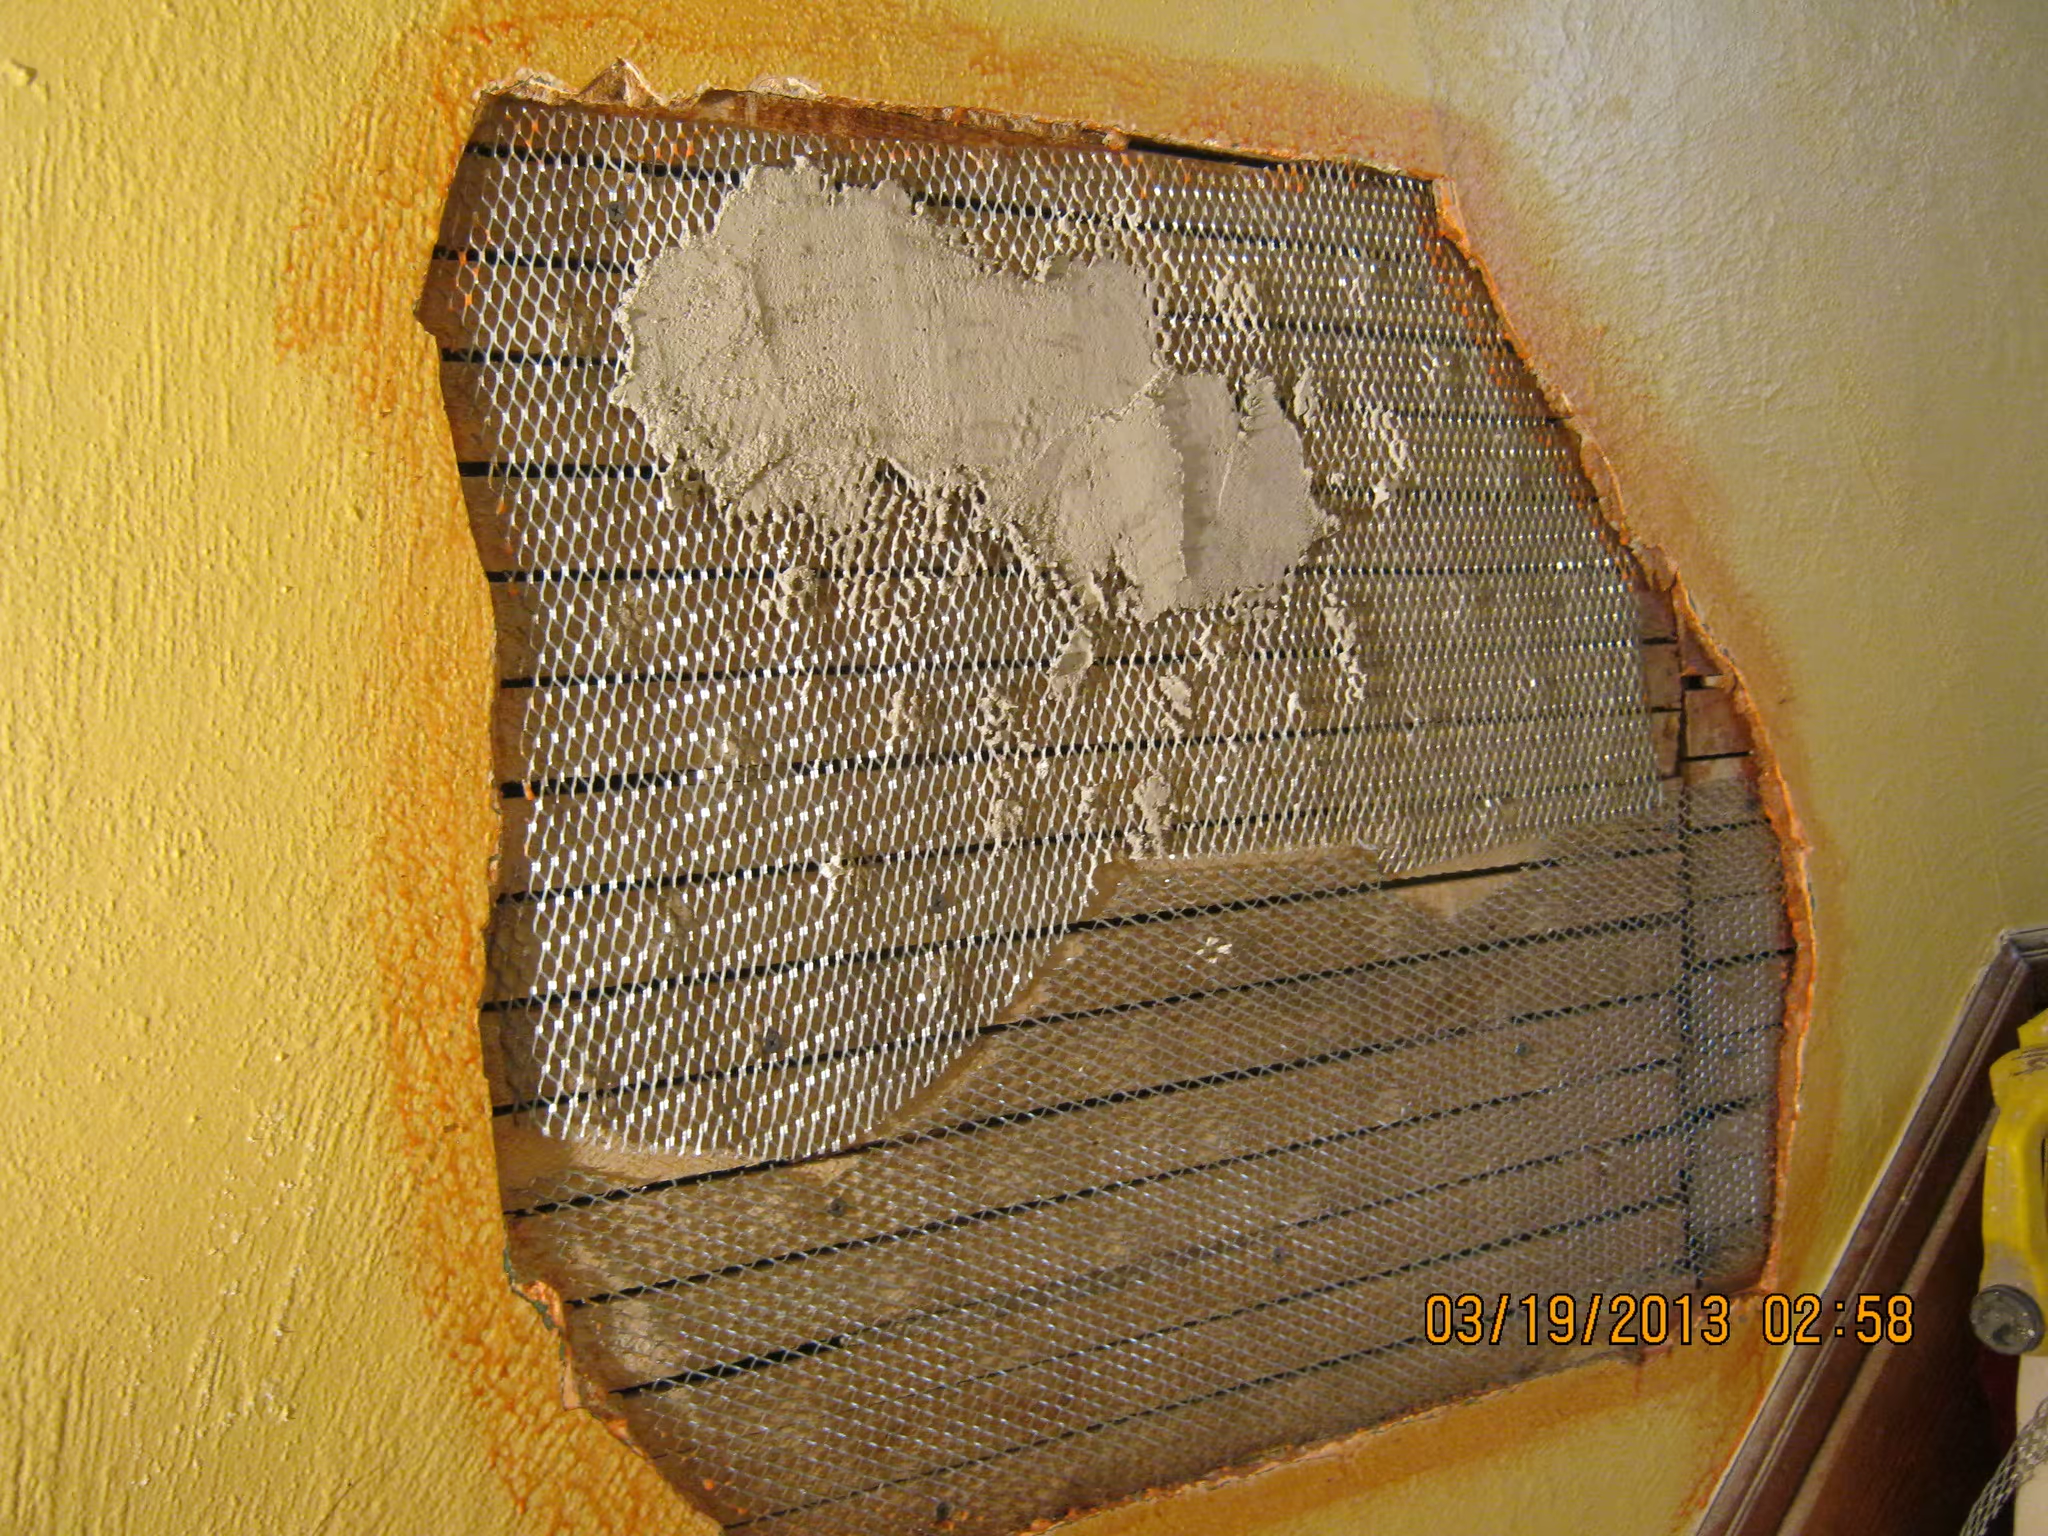
If your home has wood lath, we will cover the wood lath (we do not remove it!) with metal lath as seen in the image below. Then we apply plaster basecoat to the metal lath. Once the basecoat plaster sets (usually) about an hour, we will finish the plaster repair, the same day. (the next step is priming the patch - no sanding! No more dust!) In this scenario, the thickness of the newly applied plaster patch can sometimes be an inch thick!
Conservative Plaster Repair
It can take 2+ weeks in some cases for the new plaster patch to dry enough to prime and paint it due to the thickness of the new material.
Most contractors, will get out the oscillator or reciprocating saw and cut out the wood lath.(I will explain why this is bad in a moment) Their next step is to stick a piece of drywall in the hole, making it as level as possible with the surrounding wall or ceiling surface. Then they apply a product called Durabond (comes in a brown bag) which goes harder than typical joint compound, into the joint between the drywall and the pre-existing plaster. Once that sets, they would hopefully use either paper tape or mesh tape (better) over the hardened durabond (an industry-wide mistake!). Then apply a product called 'easy sand' over the tape, which creates the famous 'cloud of dust' when sanded. Once thats set, one more coat of easy-sand, and then sand (lots of dust), prime and paint.
Removing the wood lath can lead to all sorts of expensive problems, often resulting in Change Orders for you, the homeowner! How? Because your entire wall or ceiling is attached, with extremely hard, yet brittle plaster keys. When you attempt to cut wood lath out of a wall or ceiling that your not demolishing, you can cause severe vibrations in the wood lath. These vibrations can break the plaster keys leading to stress cracks in the 'good' plaster!
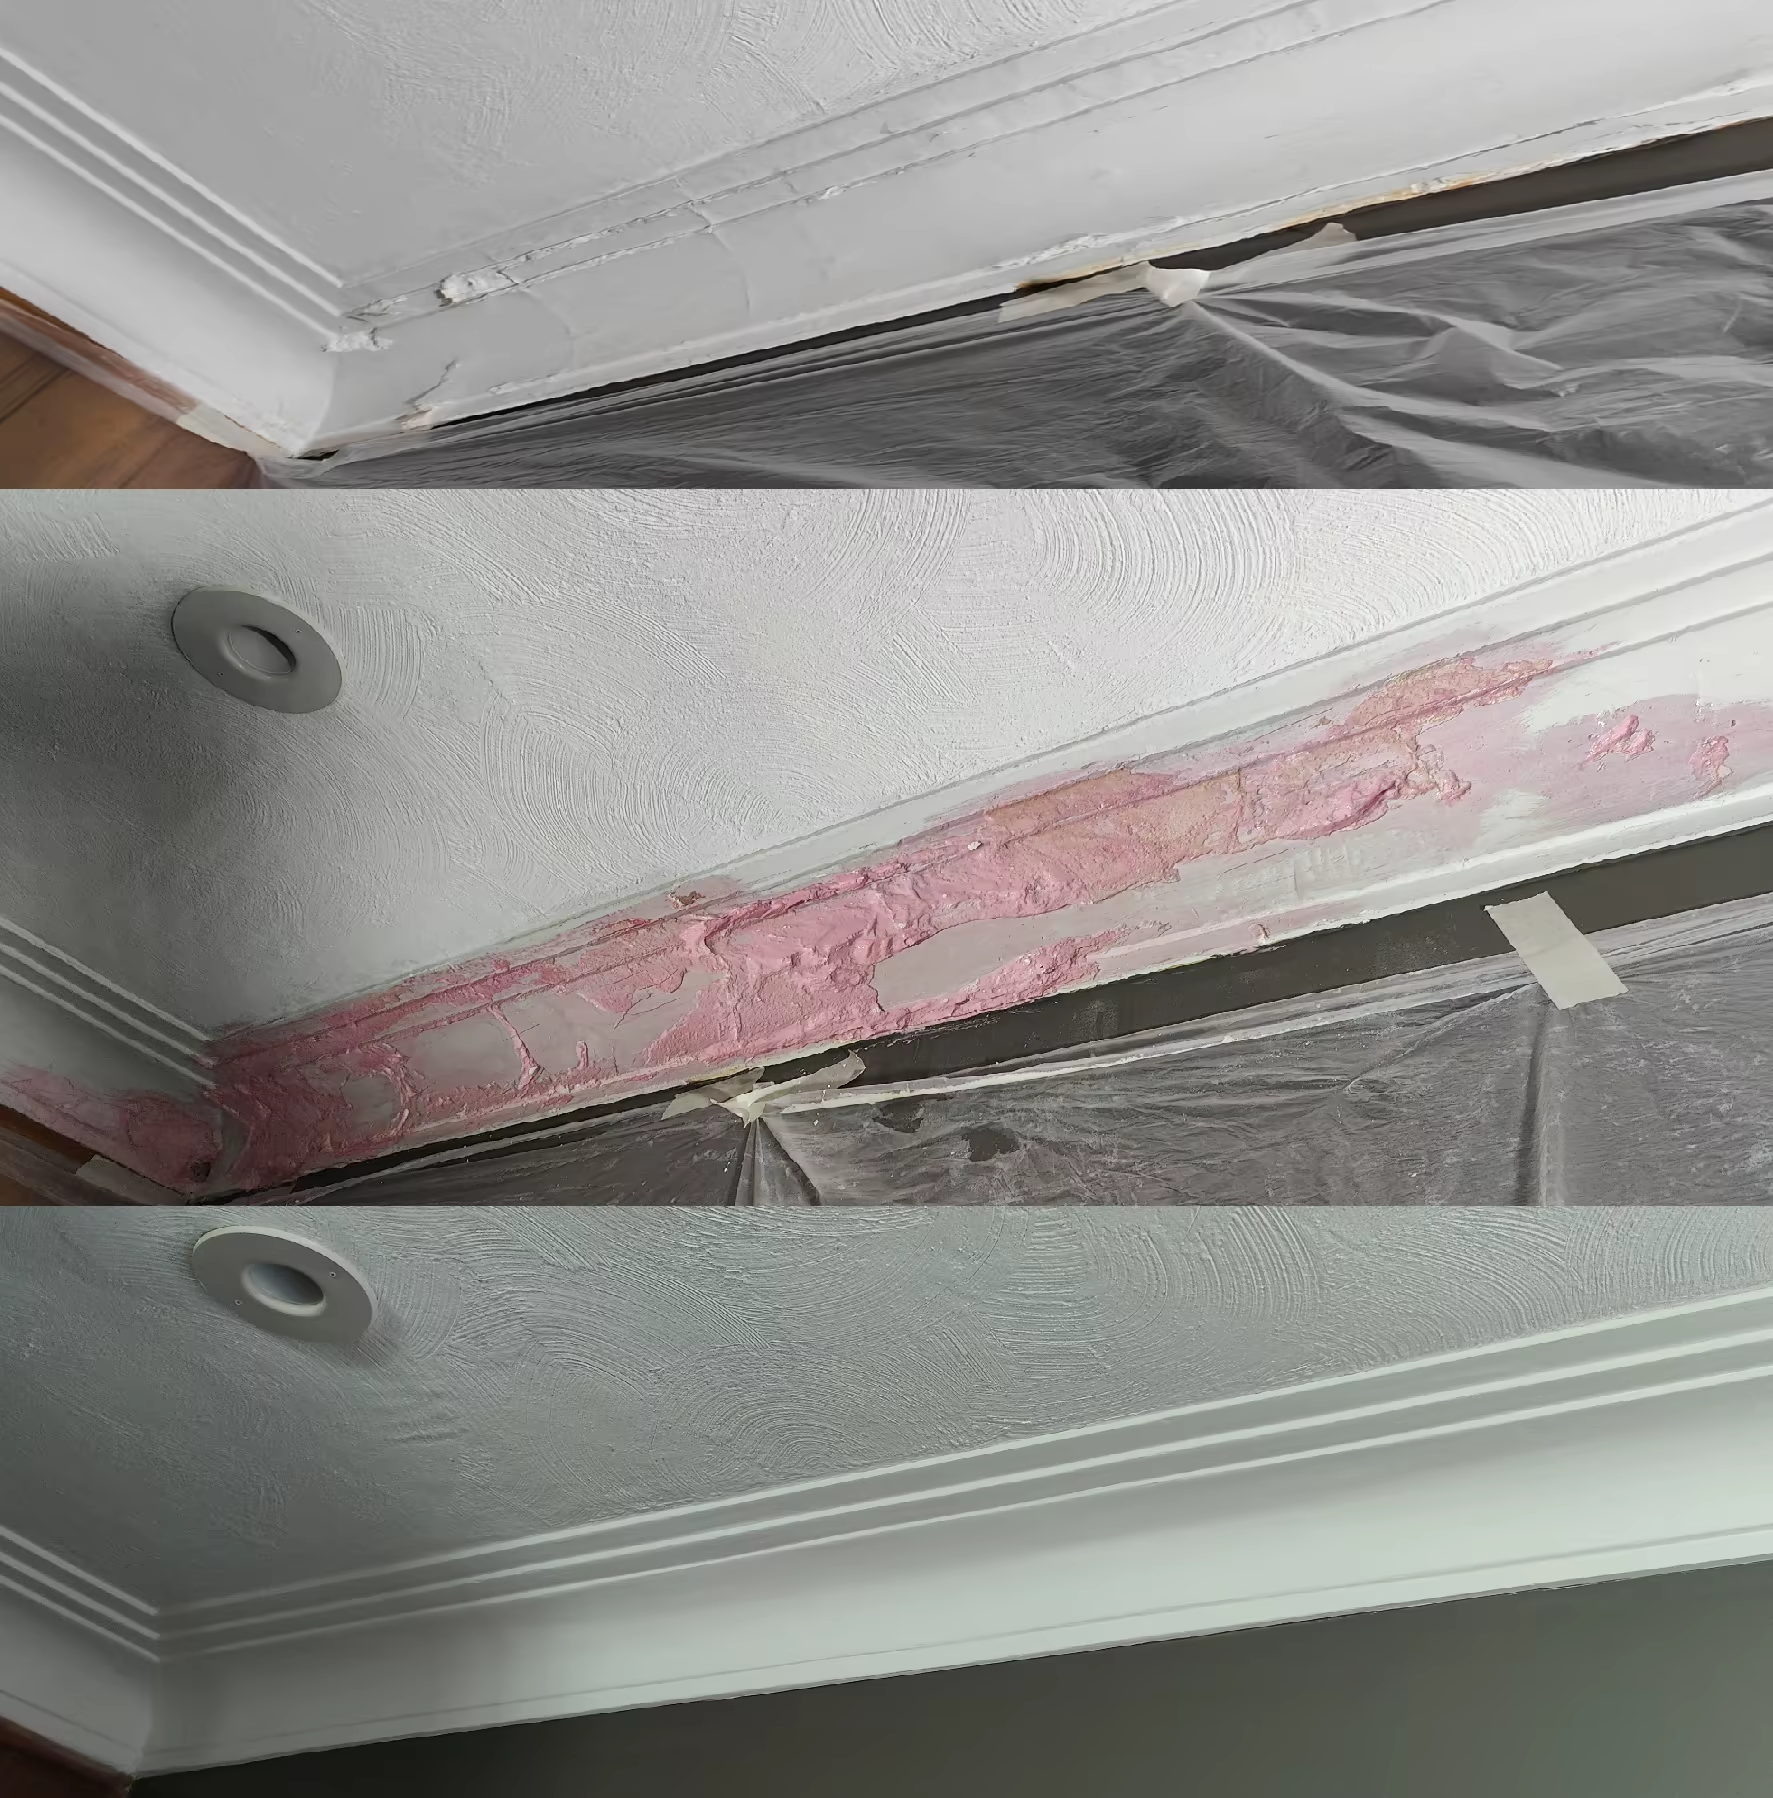
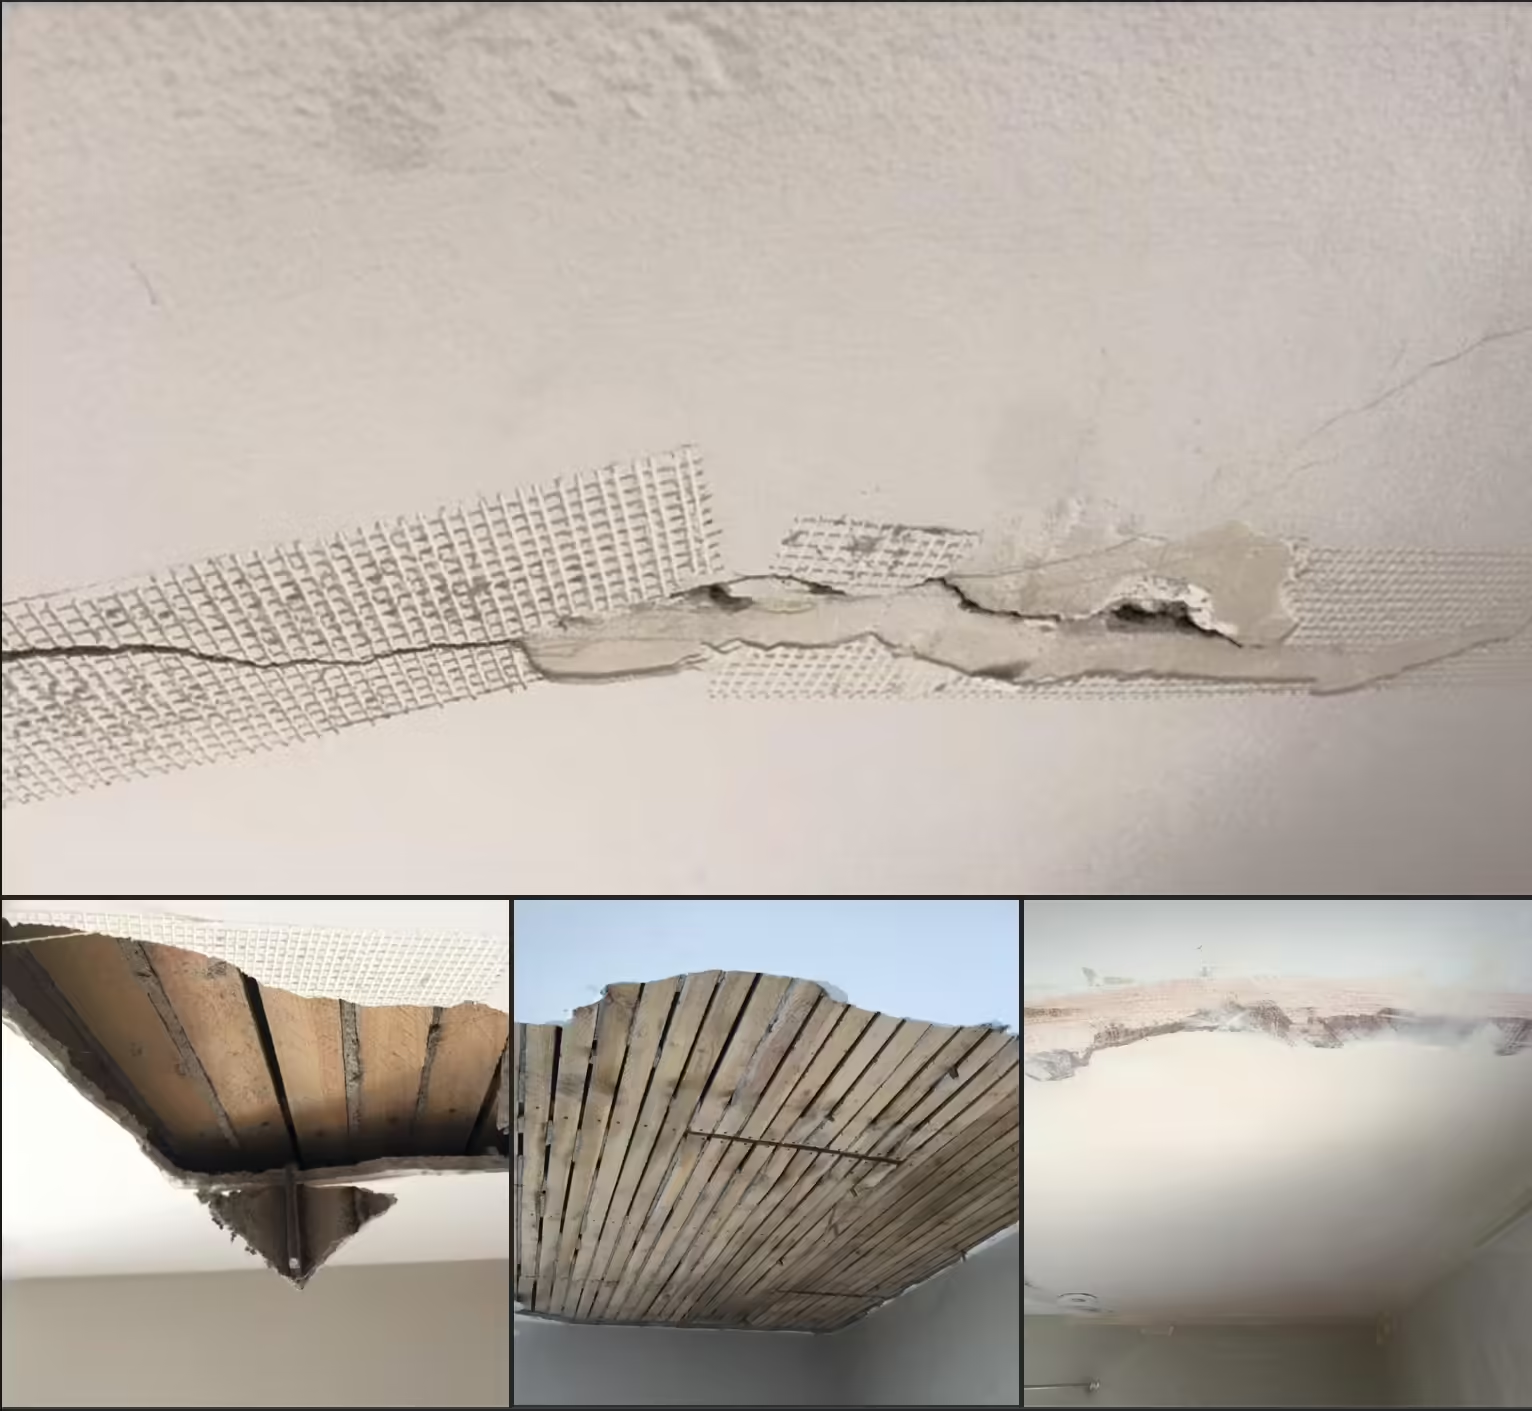
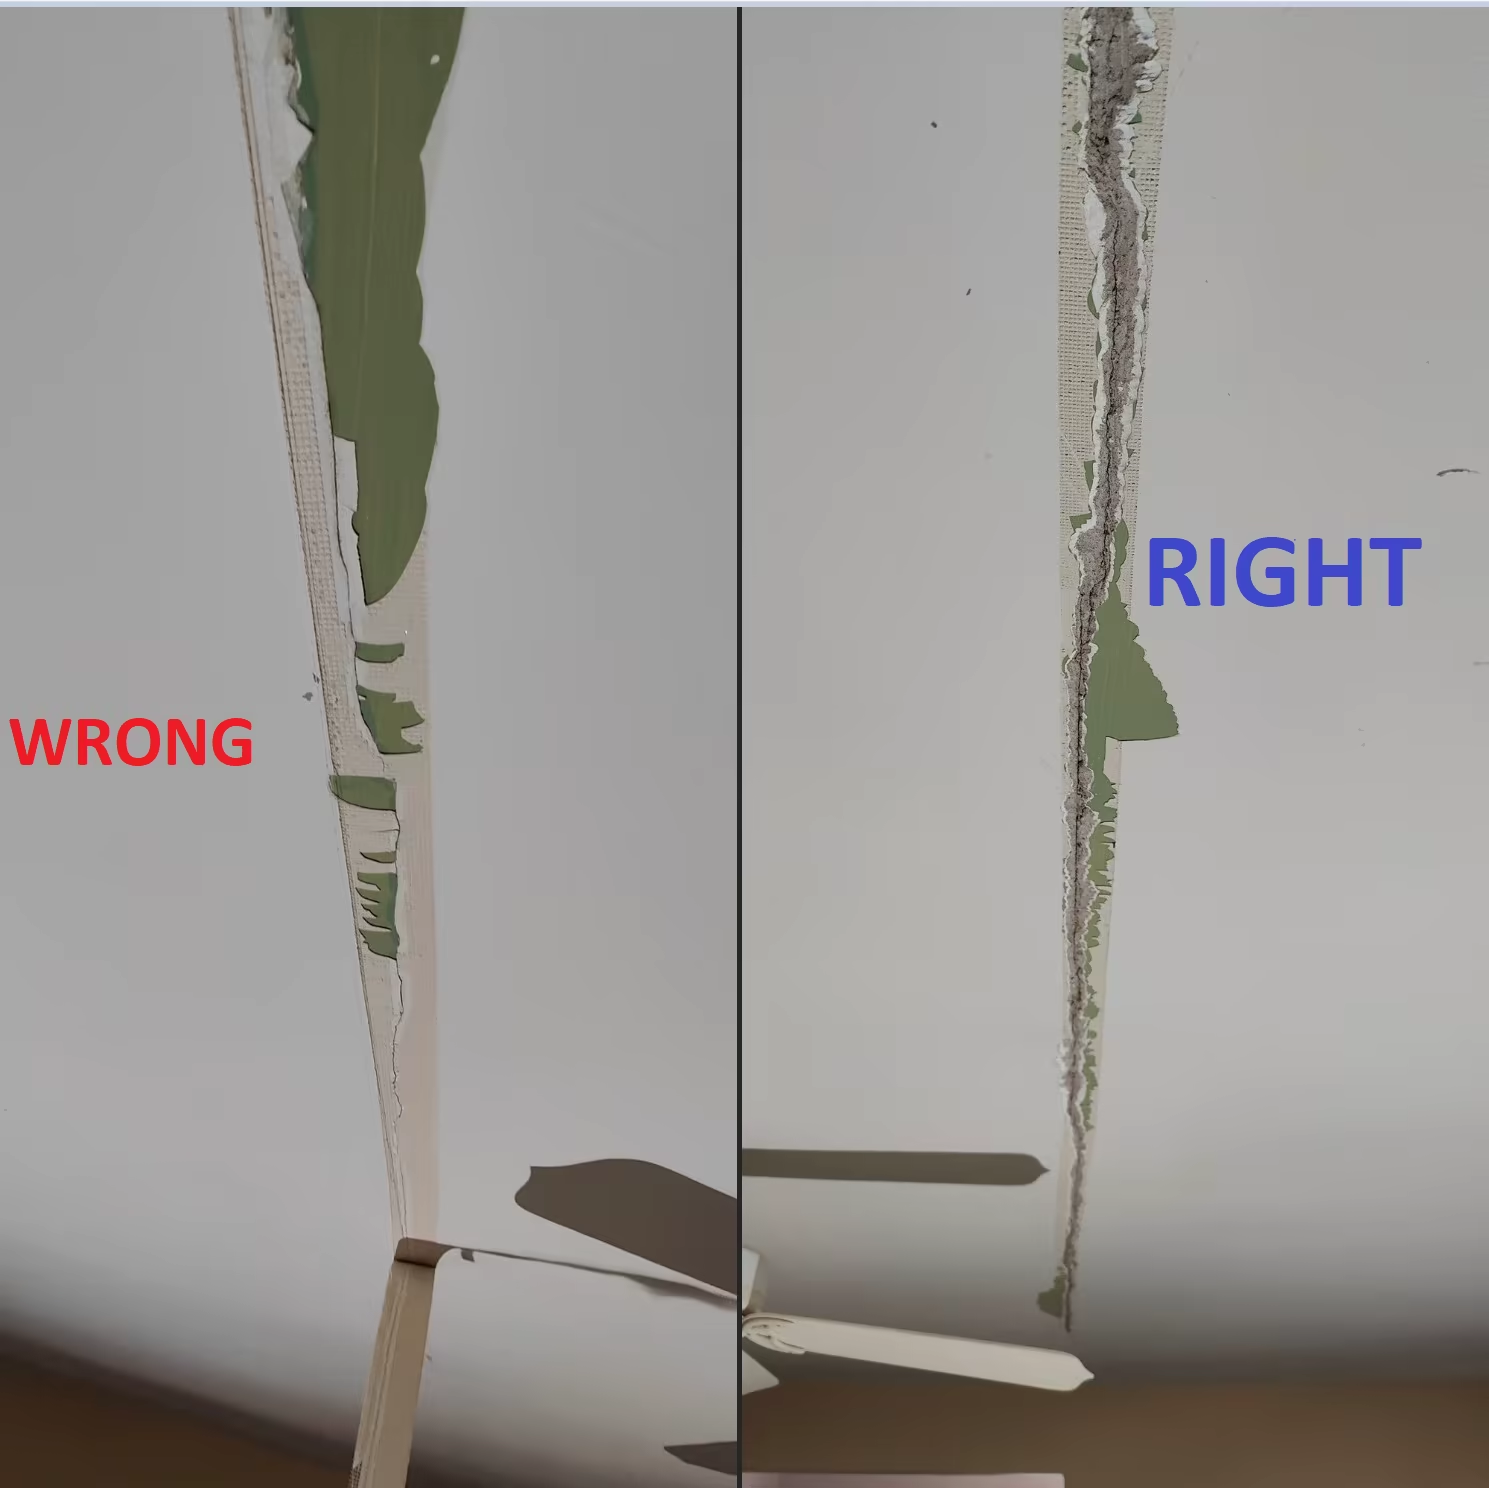
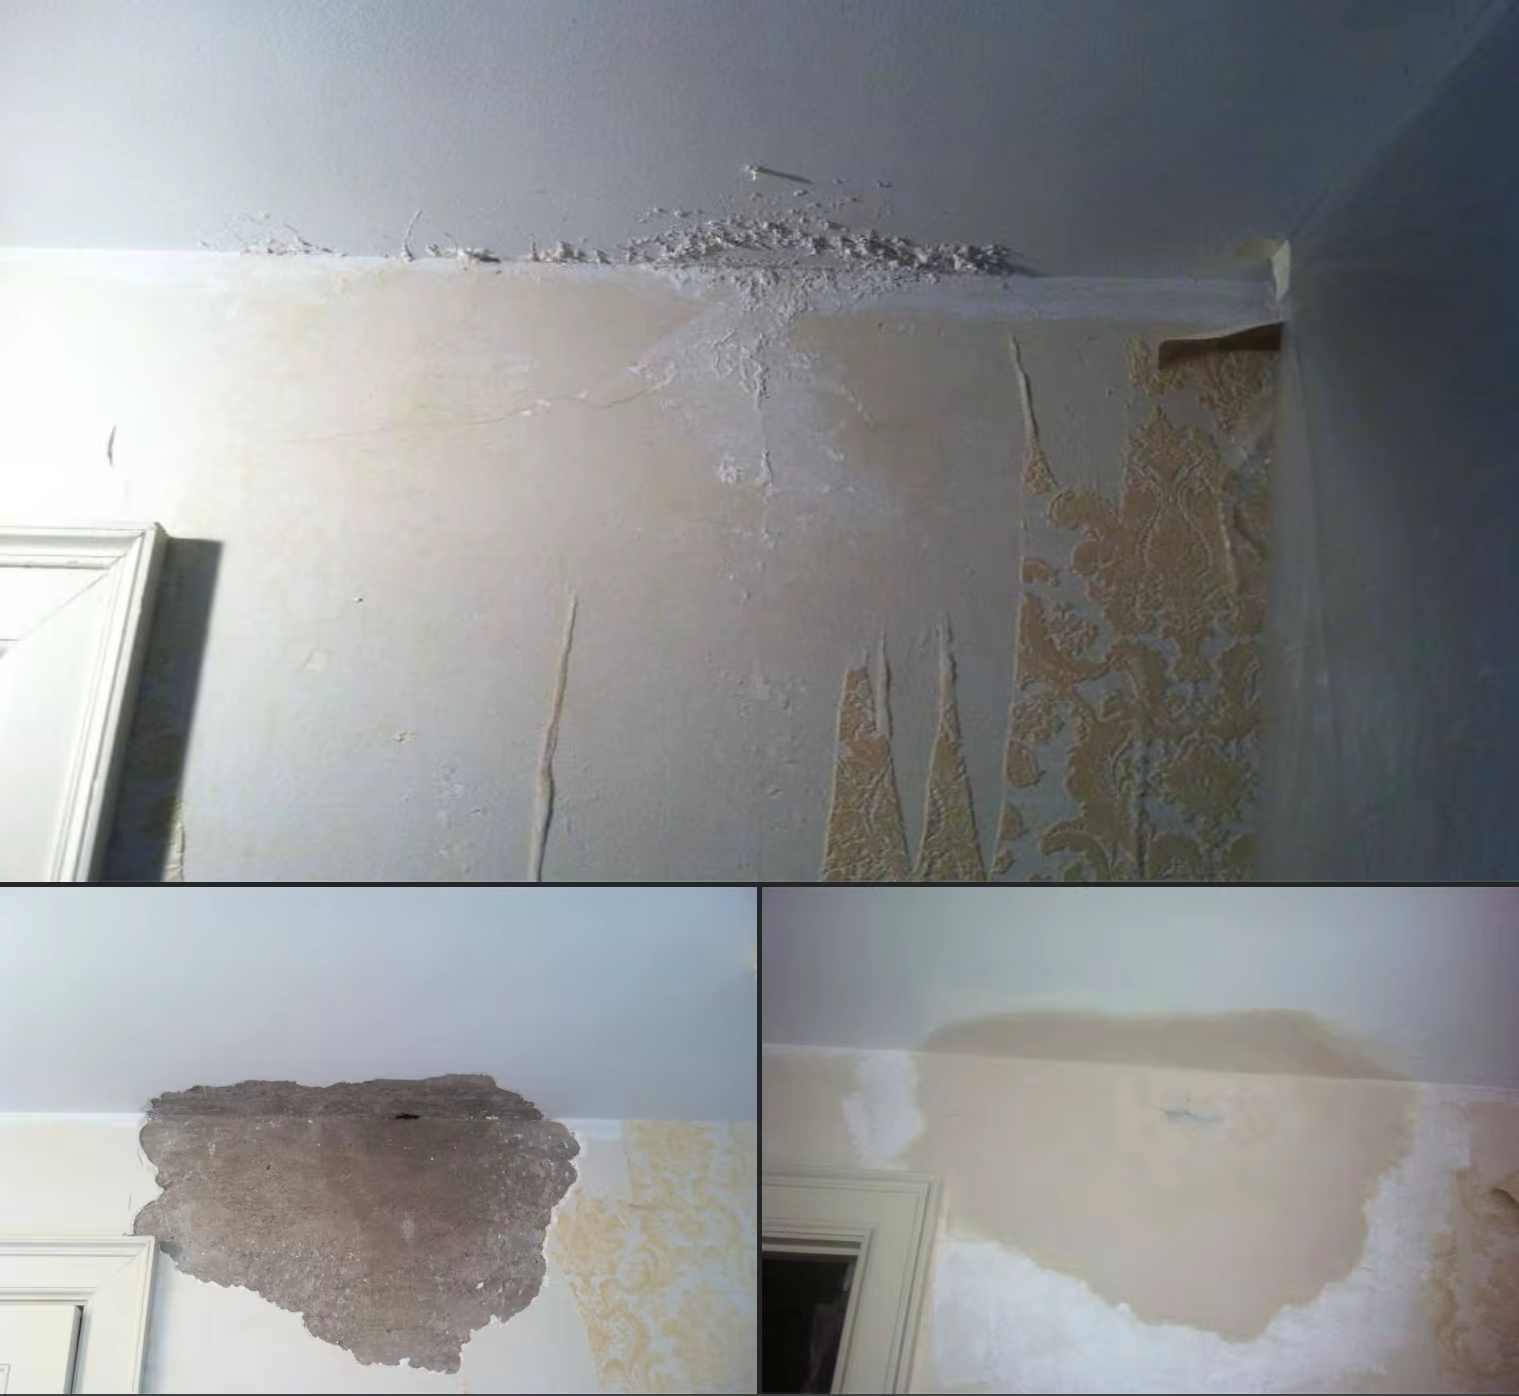
Below is an example of a 'fix' of this crack in a bedroom ceiling in Williamsville. First you can see the mesh tape was improperly installed. Mesh thats installed properly doesn't come off. You can clearly see the drywall compound layer over the ceiling paint.
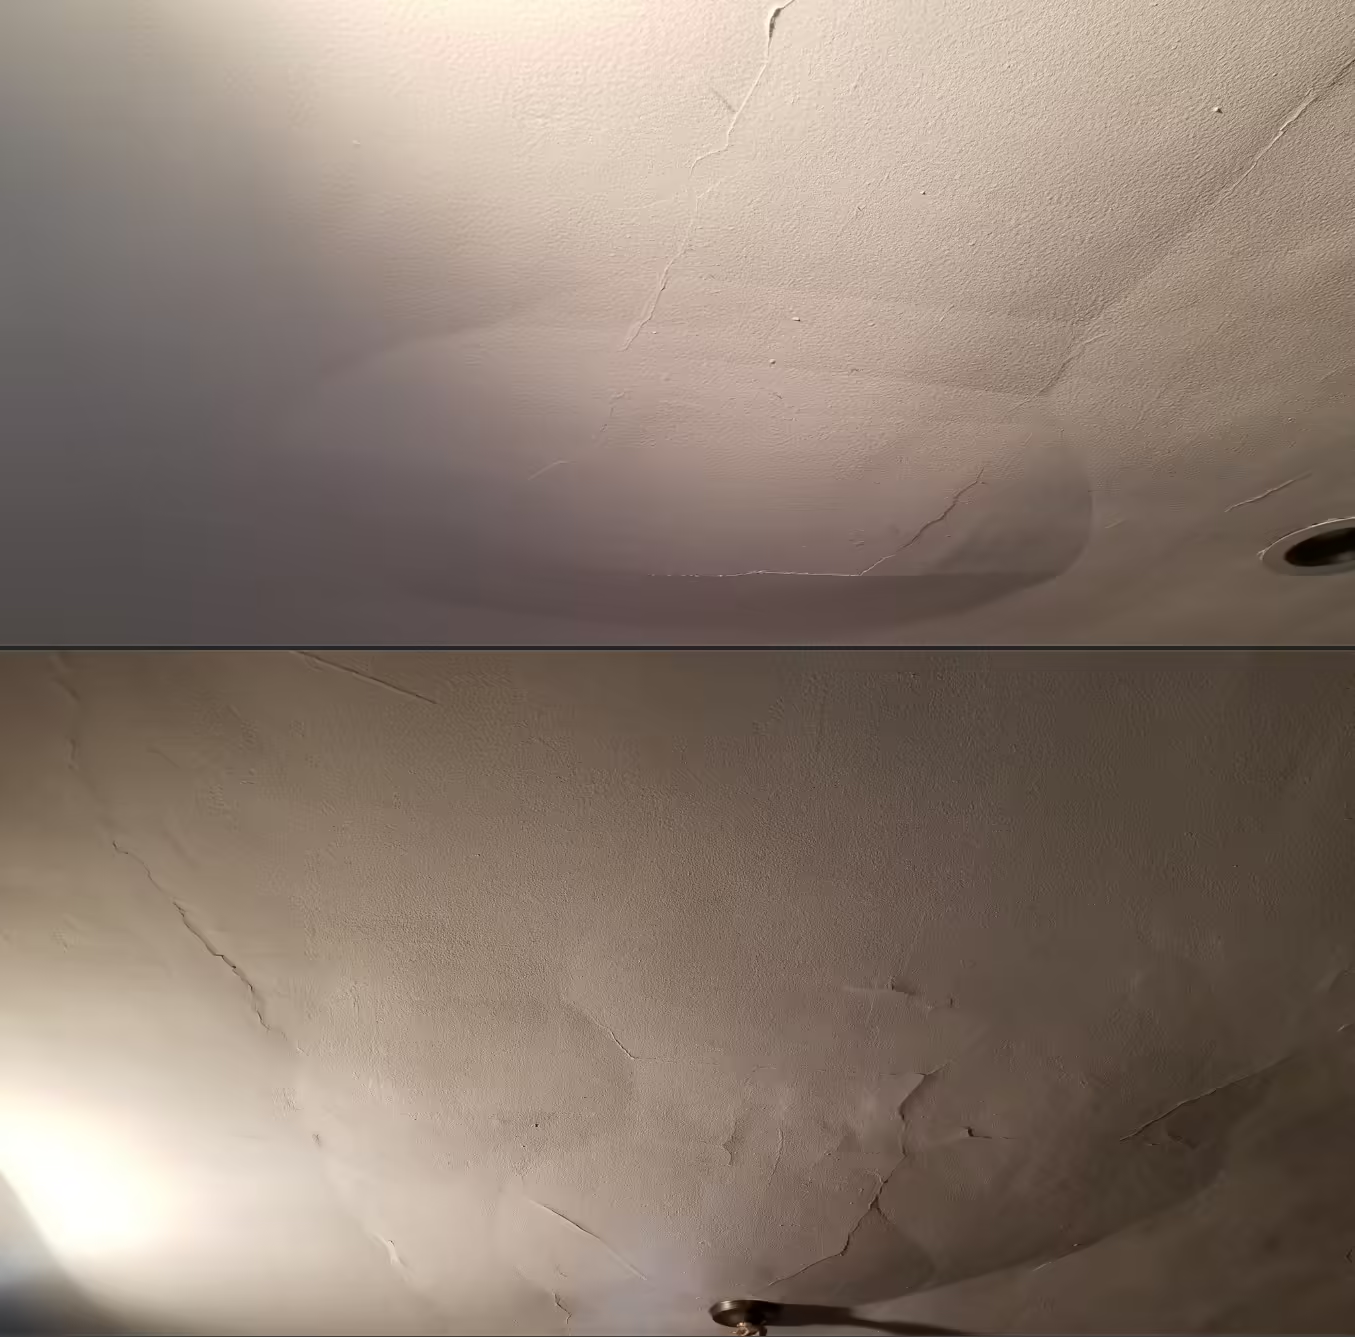
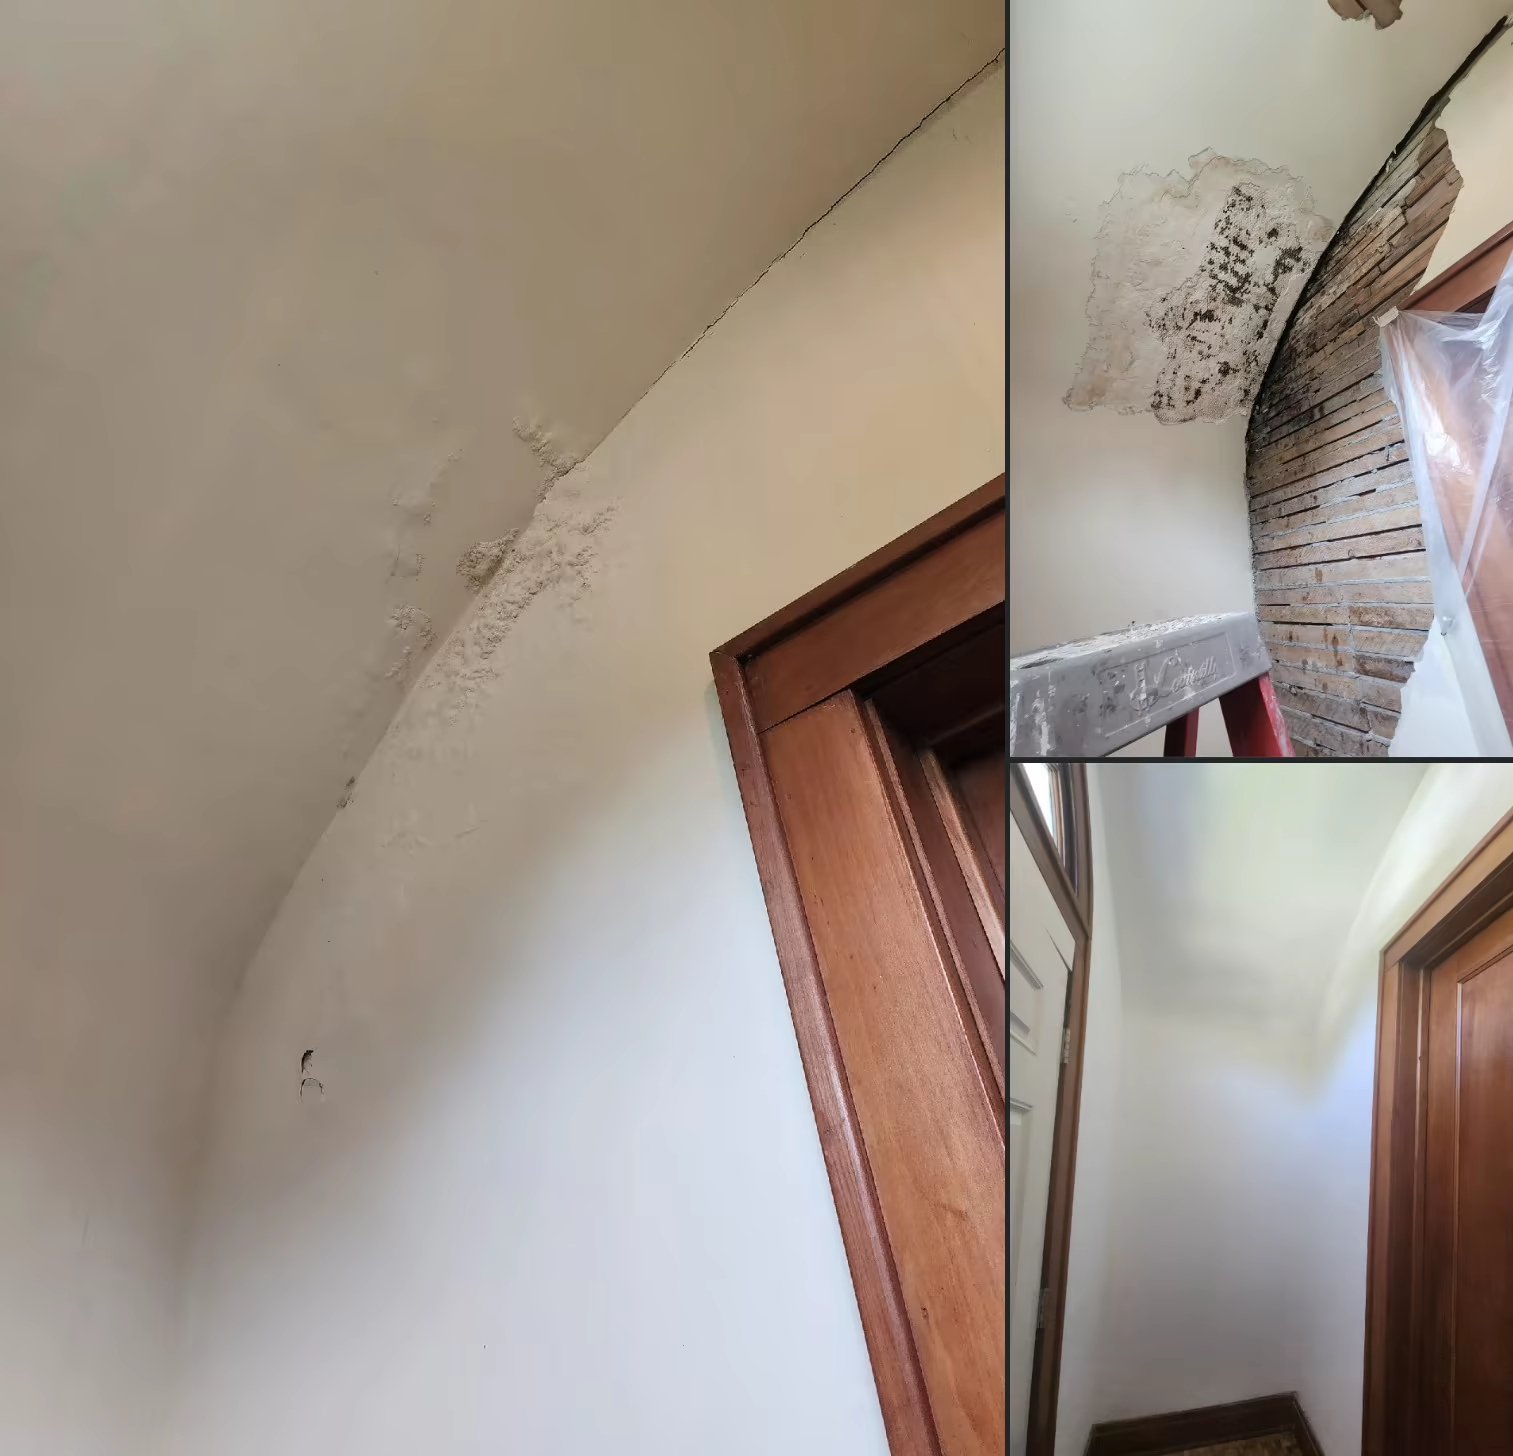
However, the underlying issue was overlooked—the plaster is no longer attached to the ceiling because all the keys are broken! Over such a large area like this (5' x 8'), it can be very deceiving. The inherent rigidity of plaster is what holds it in position (We see this most often with plaster bulges, 2nd photo from the top). This situation is more prevalent than commonly believed. Aside from the initial hole we made, the rest came off by hand. We installed metal lath to the wood lath, then plaster basecoat, then finished with Lime and Plaster of Paris.
If your home has rocklath, we will often use Blueboard as a backer, since you can no longer acquire rocklath in the Western New York area unless you buy a semi trailer of it (seriously). We install the Blueboard, and then apply plaster to the entire surface of the patch, taking care to not overlap onto the existing surface.
Blueboard (opens in a new tab/window) looks like drywall, but has a special coating to facilitate the adhesion of plaster. Plaster doesn't like to stick to anything, which becomes a real problem for those lacking experience.
Carrigan Painting
When patching plaster, with plaster, we apply material only to the damaged area. We also use a bonding agent to help 'glue' the new plaster to the old plaster. This bonding agent does not aid in application. That is the pink stuff around many of our patches (it also comes in white).
With drywall patching you apply material to to the joints and edges while also 'feathering' out the drywall mud over a larger area onto the existing surface. The reason for this is due to shrinkage of the compound. Real plaster shrinks very little as it sets and dries. Drywall compound on the other hand shrinks like crazy! And if applied too thick, will crack.
Due to the adhesion issues inherent with real plaster, patching plaster ceilings requires a skillset the majority of Contractors in the area simply do not have. The ability to apply plaster to a ceiling and have it actually stick, and then finish it to the proper standard is a skillset that is slowly dying out among the population in general.
Fun Fact:
80% of our projects in 2023 was repair work
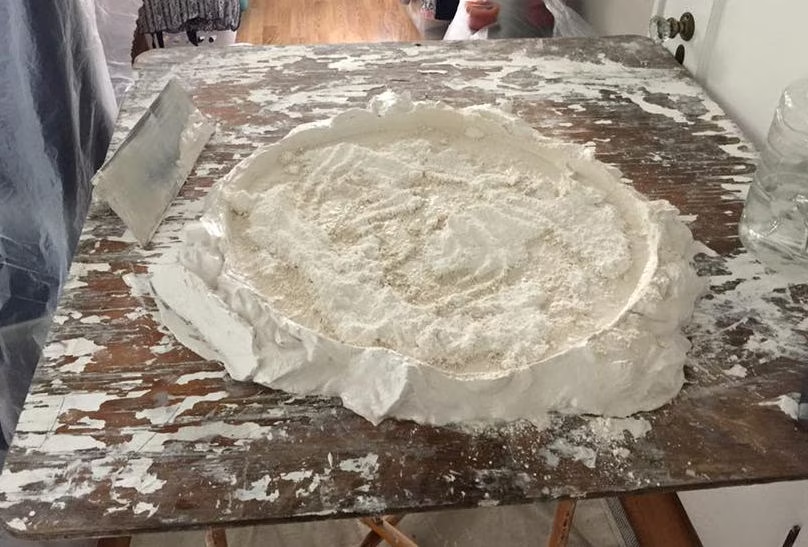
Where as drywall compound sticks to everything, your tools, walls, ceilings, glass, you, the dog, ect. Plaster, slides off your tools like butter, and when the glob hits the floor, splatters like crazy! Which is why we cover everything with plastic, and will often create a box around our repairs. Everyone drops a little plaster... and a little plaster splatters A LOT!
Plaster Crack Repair
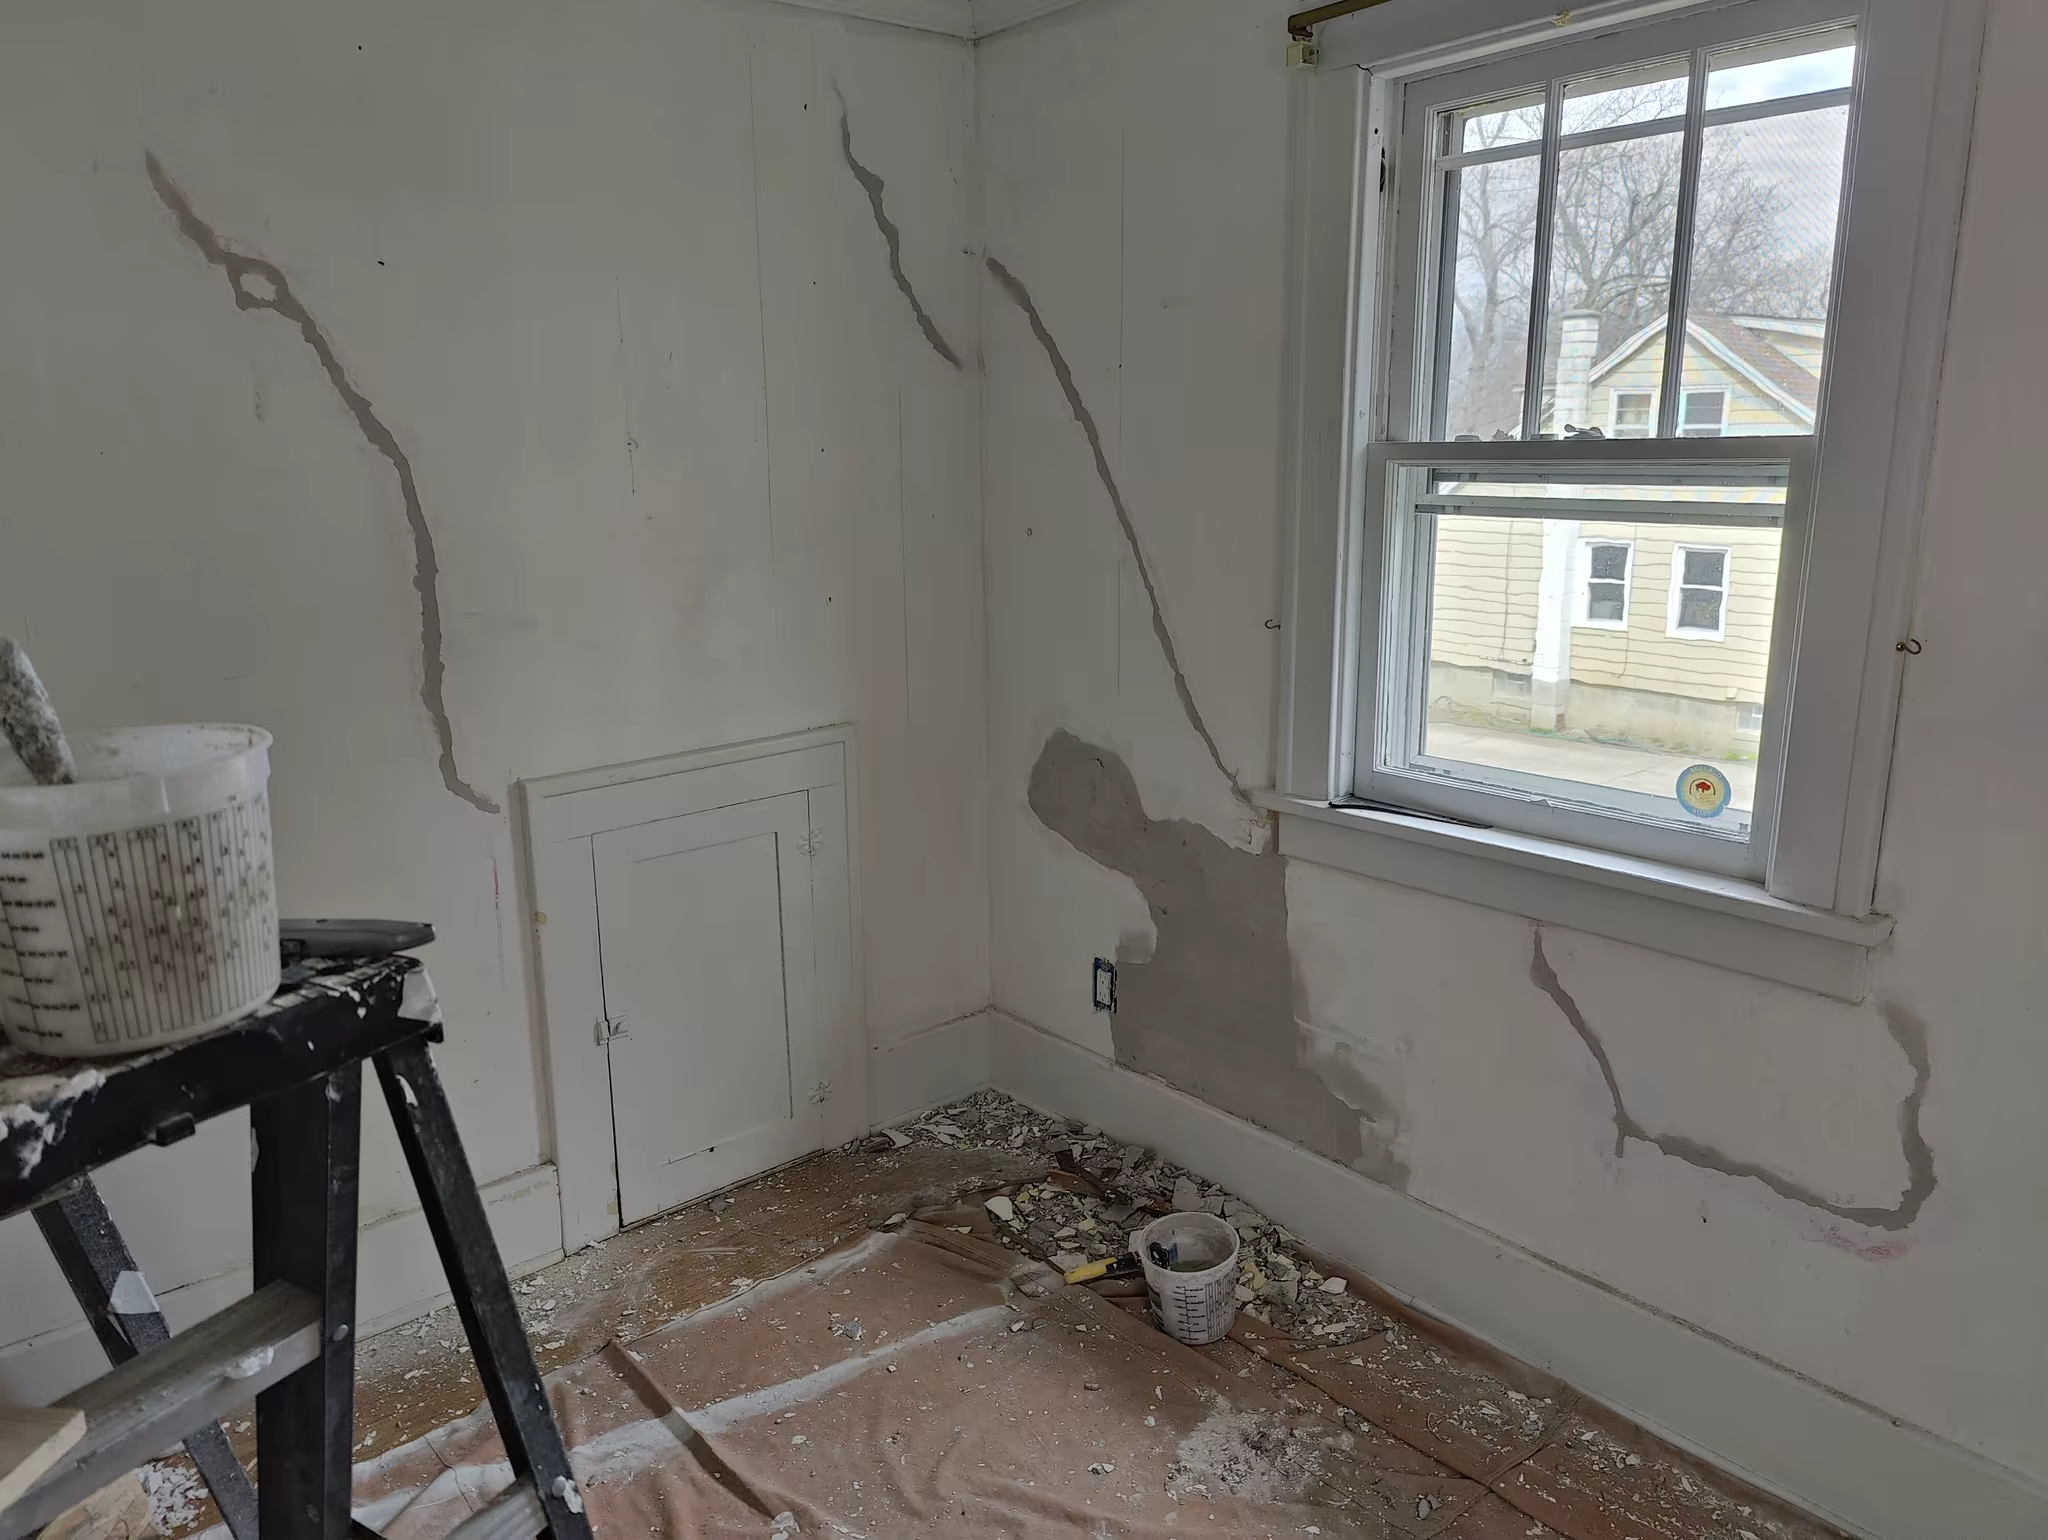
We also repair cracks in ceilings and walls. Small cracks, hairline cracks are typically the result of natural movement of your home. For example around your fireplace in your living room or bedroom. Small cracks from Buffalo winters, the occasional blizzard, are usually not a cause for concern, however large open cracks signify substantial movement. You need a Carpenter first.
Cracks between the top of a doorway and the ceiling, or the corner of a window going to the floor, are examples of cracks that generally speaking, can not be fixed. So in that case, we do our best to hide them. These areas are natural stress points for the home. We can still repair such stress cracks. However it is important for you to understand that it will most likely re-crack with in 6-12 months.
Carrigan Painting & Plastering
Plaster cracks must be opened up a bit in order to give the new material something to 'key into'. Plaster can be tricky. Strike it too hard and it crumbles and now have a hole to fix (its easy to punch through rocklath). Don't strike it hard enough and the hatchet will richochet off the surface. A hatchet is often the fastest, easiest and loudest method. Non stop banging for an hour or more.
Each strike with the hatchet is a precision planned strike designed to remove X amount of finish material. Sometimes the plaster basecoat just crumbles (Usually with wood lath because the wood flexes and plaster does not), so we need to open it up more. However in the hands of the inexperienced, using a hatchet can be disasterous. We take a thorough but conservative approach when it comes to removing material.
Patch. Prime. Paint.
Plaster Repair in Amherst, NY - blog post about the picture above
The goal is to remove the finish coat of plaster, and open the crack in the basecoat a little bit. If the person doing the repair, strikes the surface too hard, or at the wrong angle, the hatchet may create a hole (bad) or break the keys, causing the basecoat to lose its mechanical adhesion (worse). An oscillator works well but creates a lot of dust and can be hard to control for a novice, not to mention dangerous.
The problem with power tools and plaster repair is a control issue. Anything that causes the wall or ceiling to vibrate is bad unless the goal is to demolish the entire ceiling. If the area being worked on, was repaired previously, and metal lath was used, when the metal lath catches on the blade of the power tool, bad things happen.
Once the crack is opened, we will often use plaster of paris with a touch of lime to fill in the crack with new material. We will lay fiberglass mesh tape into the fresh plaster, then finish the repair. This method provides the strongest possible repair for plaster cracks.
The mistake, from what we have seen is people do not embed the tape into the mud when patching. This is especially true with mesh tape! The correct way to apply mesh tape is to lay down a bed of mud first, then lay the mesh tape into the mud, using your knife, scrape off the excess leaving enough material to hold the tape in place and cover the joint. Laying tape over any hard painted surface and mudding over it does nothing but waste material. The mud will not magically connect on the backside of the tape!
In new drywall installation they apply the mesh tape directly to the un-painted drywall. That is why its sticky.
Proper Crack Repair
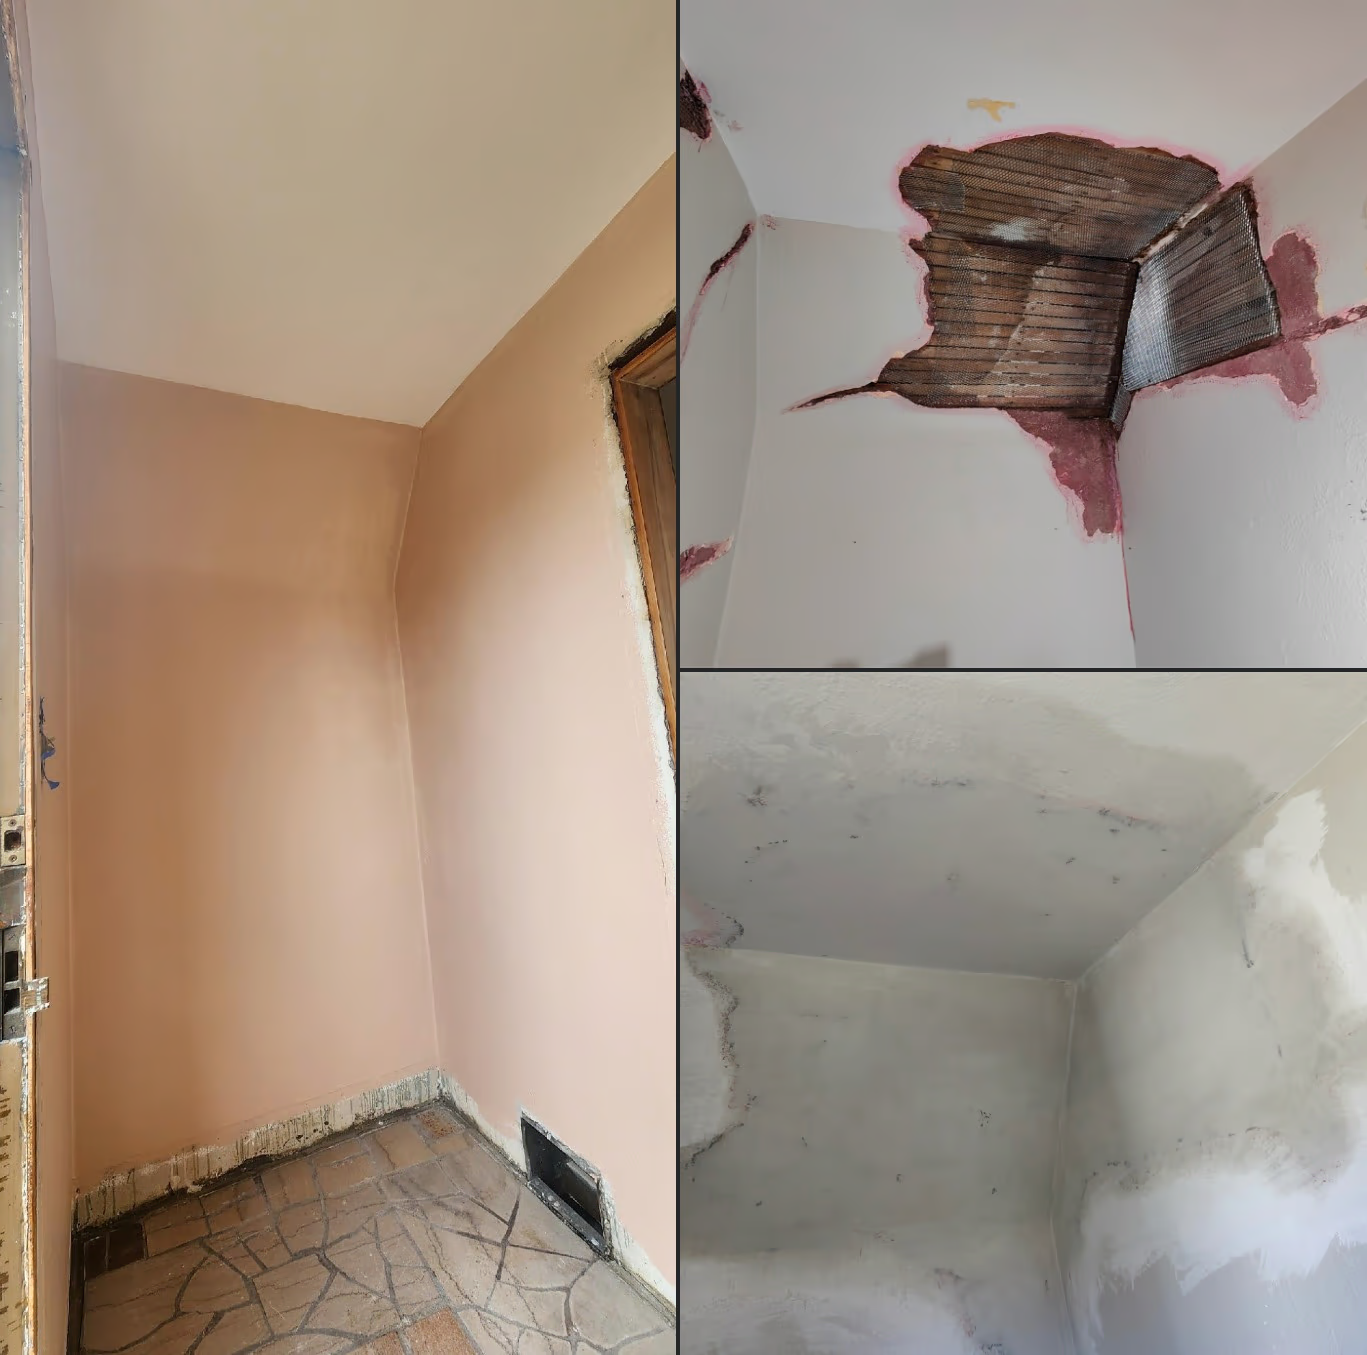
This is water damage in an entryway. The curved ceiling made repairing this with drywall impractical. As such we were called to fix the water damage and paint. That is not mold on the ceiling! Thats metal lath from a previous repair which we left in place.
We also left the original wood lath in place and attached metal lath to the wood lath. This provides the strongest possible repair.
Water Damage Plaster Ceiling Repairs
Most of the time, water damaged plaster, appears smaller than it actually is. Often, we wont know how big it will get, til we actually get into it. What often happens is the finish coat of plaster will peal off the basecoat around the damaged area with a putty knife. It will come off in 'sheets'. So while the direct damage may appear small to the unintiated, the actual repair can be much larger.
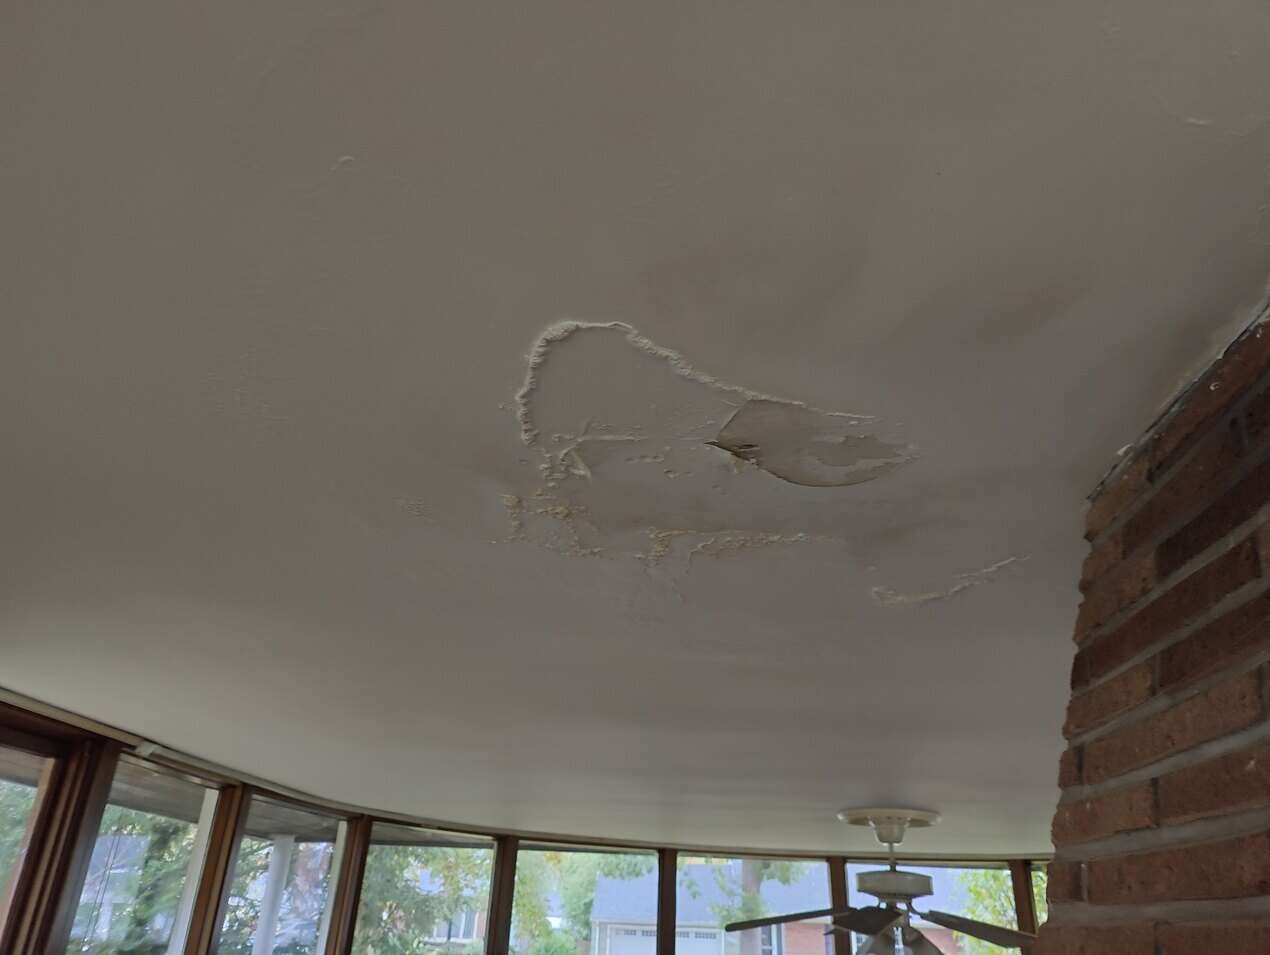
The 'corrosion' you see on the plaster surface is called efflorescence. Its the lime in the finish coat reacting with water. The water dillutes the salts in the lime causing this powder to appear. Here is a blog post about this picture: The Buterfly House. That is not a typo!
Don't despair over Plaster Repair
This is why its so important to hire those who work with these situations on a regualr basis. It is very easy for the novice to get in over their head, which often leads to costly Change Orders for you, the homeowner. This is why many painting contractors will avoid plaster repair all together.
We do not offer any mold mitigation services. Mold requires special training, expensive insurance, and licensing to be done correctly. An excellent resource is this guide by the Environmental Protection Agency A Comprehensive Guide to Mold, Moisture and Your Home by the E.P.A. (Opens a new window/tab)
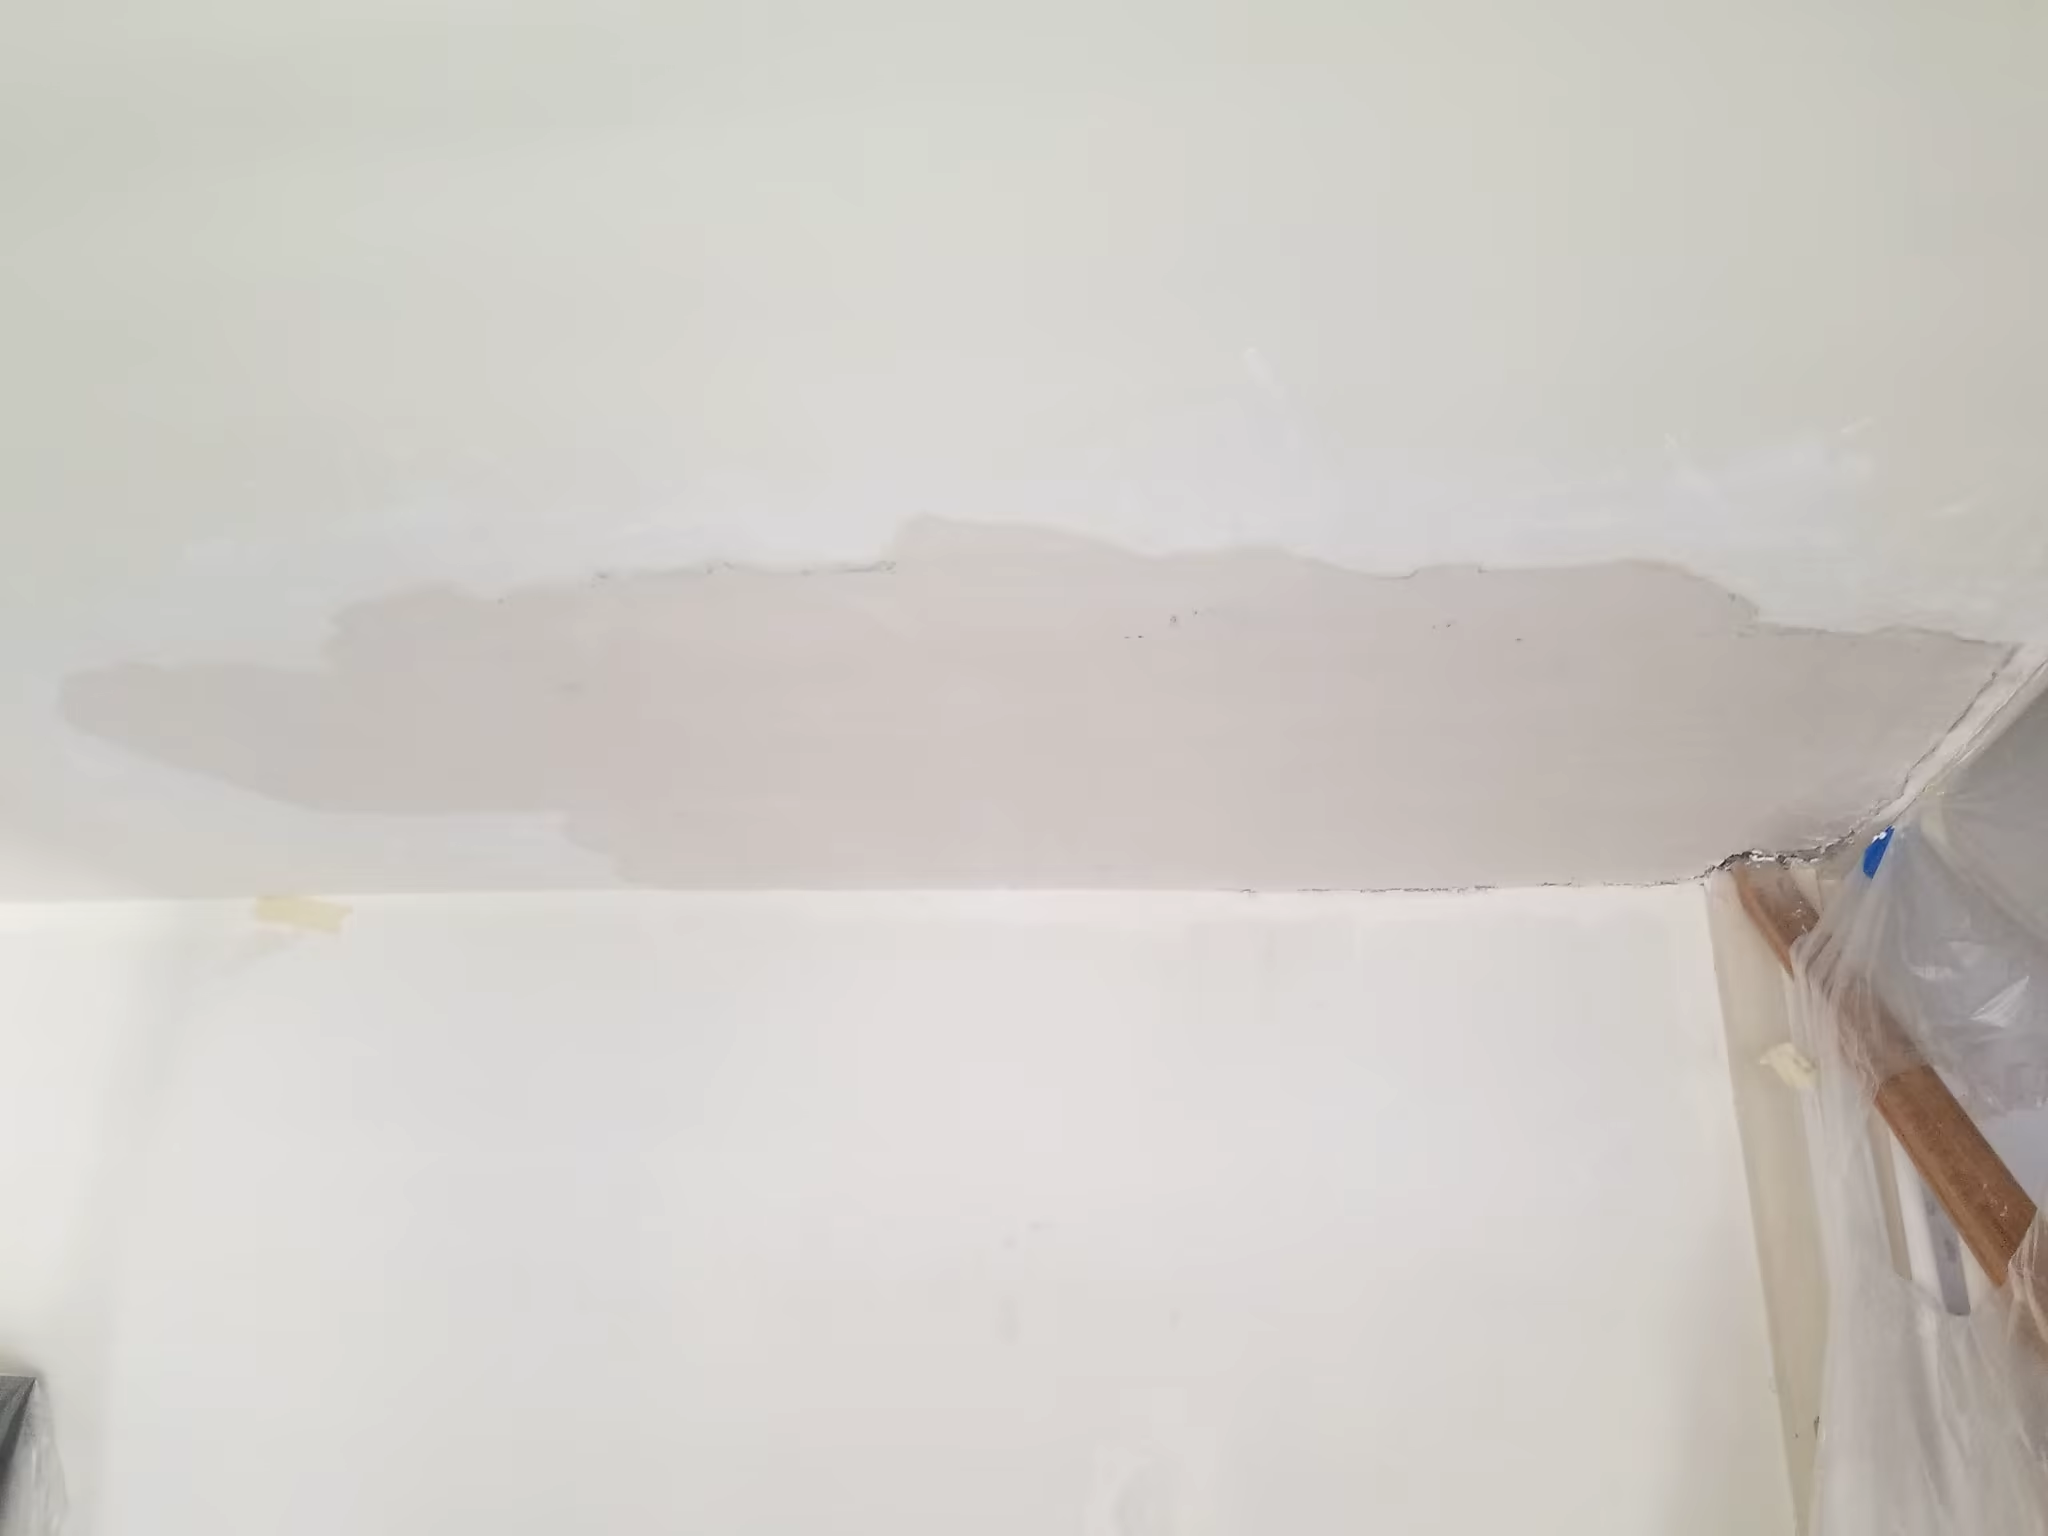
We prime all of our repair work. We do this because it shows us the imperfections in our work. New plaster, and water stains require an oil based primer. Many people wrongly assume that you can prime 10 day old fresh plaster with shellac primer. From actual experience we can tell you this is false. Oil based primer is required for all new plaster less than 28 days old. It usually dries with in 30 minutes and then the odor is gone.
Latex and shellac primers over new plaster that has not cured for 28 days will most often blister. This then leads to 'pot marks' in the ceiling that must be patched using drywall compound. In every instance in which we have tried using shellac on new plaster, it has blistered. Every. Single. Time. So we stick with the stinky oil primer.
Skim Coating & Level 5 Finishes
We do offer skim coating services. This is very labor intensive, and often involves a considerable amount of dust. We include priming with all of our bids. A level 5 finish, is when you apply a very thin coat of drywall compound to the entire wall or ceiling surface typically over drywall. When done correctly it gives walls and ceilings buttery smooth uniform appearance. It should be noted, that there is no 'industry standard' to a level 5 finish. So communication between all parties is critical to address any concerns.
We understand that you must live in your house while we are performing our work, and will do everything we can to minimize our impact into your daily life. With repair work, there are 4 distinct phases which often require blocks of days. 1-3 days at a time or more to complete our work. Multiple Phases often occur concurrently.
Phase ISetup & Demo: We set up the job, bring in necessary tools, equpment & materials. This is by far the loudest phase of the job, as we often are using power tools and hatchets. Also tends to be the dirtiest, but we clean up daily, and we cover everything with plastic. Dust containment is an art.
Phase IIThe Repair: We are installing new material in this phase. Depending on the job, this may require multiple consecutive days. We try to start this Phase as quickly as possible so the plaster can begin to dry. Phase III
Priming & Painting: We prime all of our repair work. This shows us the imperfections in our work, and provides us an opportunity to fix them while still on site. This has effectively eliminated our callbacks. We also paint most of our repair work as well, giving everyone more time to inspect our work. Yes, we want you to critique our work!
Phase IVClean up & Touchups: Its the end of the job. We are doing a much more thoruogh clean up than previously, and we are doing any final touch ups before we conclude the job.
Call or Text